alias を設定して、快適なUbuntu, Git環境を作ろう
bash の alias を設定する
bash の alias は ~/.bash_aliases に記述する。
sudo vi ~/.bash_aliases
すでに登録されてある alias は alias で確認できる。
alias
alias alert='notify-send --urgency=low -i "$([ $? = 0 ] && echo terminal || echo error)" "$(history|tail -n1|sed -e '\''s/^\s*[0-9]\+\s*//;s/[;&|]\s*alert$//'\'')"'
alias egrep='egrep --color=auto'
alias fgrep='fgrep --color=auto'
alias grep='grep --color=auto'
alias l='ls -CF'
alias la='ls -A'
alias ll='ls -alF'
alias ls='ls --color=auto'
alias sau='sudo apt update'
alias saug='sudo apt upgrade -y'
~/.bash_aliases に alias を記述したら source ~/.bashrc で再読み込み。
オプションで、~/.bash_profile に source ~/.bashrc を追加してもよい。
追加すると、ターミナル起動時に ~/.bash_profile に記述したコマンドが実行される(はず)
git の alias を設定する
git config --global --edit でファイルを編集する。
--global 以外にもユーザ、ワークスペースごとに設定できるみたい。
~/.gitconfig が開かれているので以下のように alias を追加する。
好きなように追加してよい。
[alias]
        s = status
        sc = switch -c
        cm = commit -m
        plom = pull origin main
sudo vi ~/.gitconfig でもよい。
なお、git config --global core.editor vim を実行することで、エディタを変更できるが、個人的に慣れないので使っていない。
ghq + peco で 楽々リポジトリ管理 for WSL2 (Ubuntu)
ghq の導入は
を参照。
peco の導入
peco は CUI でインタラクティブにリスト操作ができるツール(たぶん)。
インストール。
sudo apt install peco
ghq と組み合わせる。
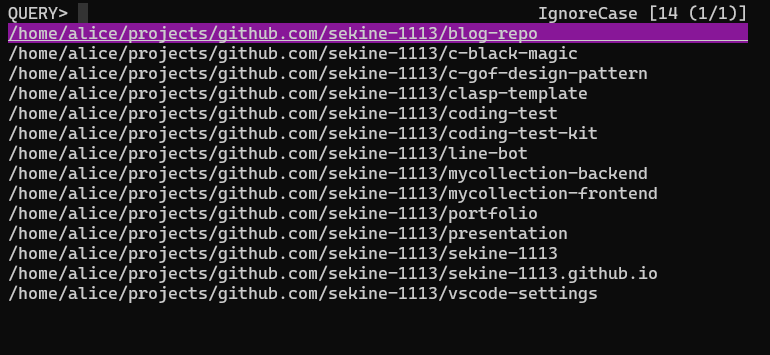
ghq list -p | peco
上記コマンドを実行すると、次の画像のような表示になる。(ghq で リポジトリを get している場合)
sudo vi ~/.bashrc
.bashrc の一番下に次の関数を追加
function ghq-peco {
  local selected_dir="$(ghq list -p | peco)"
  if [ ! -z "$selected_dir" ]; then
    cd "$selected_dir"
    code .
  fi
}
source ~/.bashrc で再読み込みを行うと ghq-peco コマンドが利用可能になる。
快適なUbuntu環境を求めて
sudo apt update && sudo apt upgrade -y
git, gh, ghq
git の導入
sudo apt-get install git
git config --global user.name "Your Name"
git config --global user.email "youremail@domain.com"
gh の導入
sudo apt install gh
gh auth login
ghqの導入
Docker
curl
sudo apt-get install curl
nvm
curl -o- https://raw.githubusercontent.com/nvm-sh/nvm/v0.35.2/install.sh | bash
nvm install --lts
ghqの導入
はじめに(仮)
ghqとは?
(ここに紹介文)
※ GHQ(General Headquarters、連合国軍最高司令官総司令部)のことではありません
ghqの導入
wsl 上に ghq を導入していきます。
まずは Go を install します。
$ wget https://go.dev/dl/go1.24.4.linux-amd64.tar.gz
...
$ sudo tar -C /usr/local -xzf go1.24.4.linux-amd64.tar.gz
$ sudo vi ~/.bashrc
$ source ~/.bashrc
$ go version
go version go1.24.4 linux/amd64
~/.bashrc に export PATH=$PATH:/usr/local/go/bin:$HOME/go/bin を追記します。
echo "export PATH=$PATH:/usr/local/go/bin:$HOME/go/bin" >> ~/.bashrc でもOK。
次に go install を用いて、ghq を install します。
$ go install github.com/x-motemen/ghq@latest
...
$ ghq --version
ghq version 1.8.0 (rev:HEAD)
go install github.com/x-motemen/ghq@latest の代わりに git clone https://github.com/x-motemen/ghq ~/ghq/github.com/x-motemen/ghq でもOK
ghq の root の設定
git config --global ghq.root <root path>
claspを用いて、ローカルで動かせるGASの環境を整える
結論
開発環境構築の手順は以下の通りです。VSCodeを使用しますが、他のエディタでも問題ありません。
- https://github.com/sekine-1113/clasp-template を
git clone - cloneしたディレクトリで
npm install npm run loginでclaspにログイン- Google Apps Script APIの設定をオンに変更
- スプレッドシートの作成または紐づけ
- 作成の場合:
clasp create <プロジェクト名> - 紐づけの場合:
clasp clone <スクリプトID>- スクリプトIDは Google Apps Scriptのエディタから「プロジェクトの設定」→「ID」に記載
- 作成の場合:
- GCPと紐づけ
- Google Cloud Platform のコンソールにアクセス
- 新しいプロジェクトを作成、画面の案内に沿ってプロジェクトの構成を設定(すでに作成している場合はスキップ)
- 新規作成の場合:「指標」→「OAuthクライアントを作成」でOAuthクライアントIDを作成
- 既存の場合:「APIとサービス」→「認証情報」→「認証情報を作成」→「OAuthクライアントID」→「ウェブアプリケーション」でOAuthクライアントIDを作成
- 「APIとサービス」→「OAuth同意画面」→「対象」→「テストユーザー」に自身のメールアドレスを入力
- エディタ(VSCode)でコードを書く
npm run deployでリモートに pushclasp run <関数名>で実行可能
テンプレートを用意しています TypeScript + clasp を動かせると思います。PRお待ちしております!
WSL2上のDockerでAPIサーバを構築する(expressとMySQL)
はじめに
DockerでAPIサーバ構築する機会が増えたので、メモ代わりに。
なお、この記事は以下の記事の内容を含みます。
DockerでMySQLとNode.jsを動かす(雑) - aliceの技術ブログ
ハンズオン
WSL2 の インストール
以下のコマンドを実行することで、WSL2をインストールできる。
PS C:\Users\******>wsl --install
詳細は以下 learn.microsoft.com
WSL2 に yarn を入れる
この記事を参照 alice-tech.hatenablog.com
Docker のインストール
以下の記事を参考にDockerをインストールする learn.microsoft.com
WSL上でAPIサーバのディレクトリを作成し、エディタを開く
ディレクトリを作成
mkdir api
作成したディレクトリに移動
cd api
code .
Docker で MySQL のイメージを取得
docker pull mysql
しばらく待つと以下のような表示が出て完了する
docker pull mysql
Using default tag: latest
latest: Pulling from library/mysql
fcbdc4090331: Pull complete
95eb5073c36f: Pull complete
5e5ba0e6412a: Pull complete
ee4654eb29b7: Pull complete
1d2218160b86: Pull complete
bbe712936412: Pull complete
4a6efa152609: Pull complete
0f7c3b67bb2b: Pull complete
7ccd17e83c8a: Pull complete
04bf2c116556: Pull complete
Digest: sha256:4a4e5e2a19aab7a67870588952e8f401e17a330466ecfc55c9acf51196da5bd0
Status: Downloaded newer image for mysql:latest
docker.io/library/mysql:latest

What's Next?
  View a summary of image vulnerabilities and recommendations → docker scout quickview mysql
うまくいかなければ公式ドキュメントを読む hub.docker.com
docker-compose.yml の作成
touch docker-compose.yml
version: "3"

services:
  db:
    image: mysql
    restart: always
    environment:
      MYSQL_ROOT_PASSWORD: "password"
      MYSQL_DATABASE: "test"
      MYSQL_USER: "alice"
      MYSQL_PASSWORD: "password"
      TZ: "Asia/Tokyo"
    ports:
      - 13306:3306
    volumes:
      - ./db/init:/docker-entrypoint-initdb.d
      - db-store:/var/lib/mysql
    networks:
      - my-network

  api:
    image: api-image
    container_name: api-sample
    build:
      context: .
    ports:
      - "3000:3000"
    env_file:
      - .env
    volumes:
      - /api/:/app
    networks:
      - my-network
    depends_on:
      - db

volumes:
  db-store:
networks:
  my-network:
express のディレクトリを作る
mkdir express-api
package.json の作成
cd express-api
yarn init
yarn init v1.22.22
question name (express-api):
question version (1.0.0):
question description:
question entry point (index.js): index.ts
question repository url:
question author:
question license (MIT):
question private:
success Saved package.json
Done in 8.86s.
内容
{
  "name": "api",
  "version": "1.0.0",
  "main": "index.ts",
  "license": "MIT"
}
必要なライブラリをインストール
yarn add express mysql2 node-cron
開発時に使用するライブラリをインストール
yarn add -D typescript ts-node ts-node-dev npm-run-all @types/express @types/node @types/node-cron
package.json はこのようになる。
{
  "name": "express-api",
  "version": "1.0.0",
  "main": "index.ts",
  "license": "MIT",
  "dependencies": {
    "express": "^4.19.2",
    "mysql2": "^3.9.7",
    "node-cron": "^3.0.3"
  },
  "devDependencies": {
    "@types/express": "^4.17.21",
    "@types/node": "^20.12.11",
    "@types/node-cron": "^3.0.11",
    "npm-run-all": "^4.1.5",
    "ts-node": "^10.9.2",
    "ts-node-dev": "^2.0.0",
    "typescript": "^5.4.5"
  }
}
以下を package.json に追加する
"scripts": {
    "dev": "ts-node-dev --respawn index.ts",
    "tsc": "tsc",
    "build": "npm-run-all clean tsc",
    "start": "node dist/index.js"
}
最終的に以下のようになる。
{
  "name": "express-api",
  "version": "1.0.0",
  "main": "index.ts",
  "license": "MIT",
  "scripts": {
    "dev": "ts-node-dev --respawn index.ts",
    "tsc": "tsc",
    "build": "npm-run-all clean tsc",
    "start": "node dist/index.js"
  },
  "dependencies": {
    "express": "^4.19.2",
    "mysql2": "^3.9.7",
    "node-cron": "^3.0.3"
  },
  "devDependencies": {
    "@types/express": "^4.17.21",
    "@types/node": "^20.12.11",
    "@types/node-cron": "^3.0.11",
    "npm-run-all": "^4.1.5",
    "ts-node": "^10.9.2",
    "ts-node-dev": "^2.0.0",
    "typescript": "^5.4.5"
  }
}
tsconfig.json の作成
npx tsc --init
適当にいじります。不要部分は削除でOK
{
  "compilerOptions": {
    /* Visit https://aka.ms/tsconfig to read more about this file */

    /* Projects */
    // "incremental": true,                              /* Save .tsbuildinfo files to allow for incremental compilation of projects. */
    // "composite": true,                                /* Enable constraints that allow a TypeScript project to be used with project references. */
    // "tsBuildInfoFile": "./.tsbuildinfo",              /* Specify the path to .tsbuildinfo incremental compilation file. */
    // "disableSourceOfProjectReferenceRedirect": true,  /* Disable preferring source files instead of declaration files when referencing composite projects. */
    // "disableSolutionSearching": true,                 /* Opt a project out of multi-project reference checking when editing. */
    // "disableReferencedProjectLoad": true,             /* Reduce the number of projects loaded automatically by TypeScript. */

    /* Language and Environment */
    "target": "es2022",                                  /* Set the JavaScript language version for emitted JavaScript and include compatible library declarations. */
    // "lib": [],                                        /* Specify a set of bundled library declaration files that describe the target runtime environment. */
    // "jsx": "preserve",                                /* Specify what JSX code is generated. */
    // "experimentalDecorators": true,                   /* Enable experimental support for legacy experimental decorators. */
    // "emitDecoratorMetadata": true,                    /* Emit design-type metadata for decorated declarations in source files. */
    // "jsxFactory": "",                                 /* Specify the JSX factory function used when targeting React JSX emit, e.g. 'React.createElement' or 'h'. */
    // "jsxFragmentFactory": "",                         /* Specify the JSX Fragment reference used for fragments when targeting React JSX emit e.g. 'React.Fragment' or 'Fragment'. */
    // "jsxImportSource": "",                            /* Specify module specifier used to import the JSX factory functions when using 'jsx: react-jsx*'. */
    // "reactNamespace": "",                             /* Specify the object invoked for 'createElement'. This only applies when targeting 'react' JSX emit. */
    // "noLib": true,                                    /* Disable including any library files, including the default lib.d.ts. */
    // "useDefineForClassFields": true,                  /* Emit ECMAScript-standard-compliant class fields. */
    // "moduleDetection": "auto",                        /* Control what method is used to detect module-format JS files. */

    /* Modules */
    "module": "commonjs",                                /* Specify what module code is generated. */
    // "rootDir": "./",                                  /* Specify the root folder within your source files. */
    "moduleResolution": "node",                     /* Specify how TypeScript looks up a file from a given module specifier. */
    // "baseUrl": "./",                                  /* Specify the base directory to resolve non-relative module names. */
    // "paths": {},                                      /* Specify a set of entries that re-map imports to additional lookup locations. */
    // "rootDirs": [],                                   /* Allow multiple folders to be treated as one when resolving modules. */
    // "typeRoots": [],                                  /* Specify multiple folders that act like './node_modules/@types'. */
    // "types": [],                                      /* Specify type package names to be included without being referenced in a source file. */
    // "allowUmdGlobalAccess": true,                     /* Allow accessing UMD globals from modules. */
    // "moduleSuffixes": [],                             /* List of file name suffixes to search when resolving a module. */
    // "allowImportingTsExtensions": true,               /* Allow imports to include TypeScript file extensions. Requires '--moduleResolution bundler' and either '--noEmit' or '--emitDeclarationOnly' to be set. */
    // "resolvePackageJsonExports": true,                /* Use the package.json 'exports' field when resolving package imports. */
    // "resolvePackageJsonImports": true,                /* Use the package.json 'imports' field when resolving imports. */
    // "customConditions": [],                           /* Conditions to set in addition to the resolver-specific defaults when resolving imports. */
    // "resolveJsonModule": true,                        /* Enable importing .json files. */
    // "allowArbitraryExtensions": true,                 /* Enable importing files with any extension, provided a declaration file is present. */
    // "noResolve": true,                                /* Disallow 'import's, 'require's or '<reference>'s from expanding the number of files TypeScript should add to a project. */

    /* JavaScript Support */
    // "allowJs": true,                                  /* Allow JavaScript files to be a part of your program. Use the 'checkJS' option to get errors from these files. */
    // "checkJs": true,                                  /* Enable error reporting in type-checked JavaScript files. */
    // "maxNodeModuleJsDepth": 1,                        /* Specify the maximum folder depth used for checking JavaScript files from 'node_modules'. Only applicable with 'allowJs'. */

    /* Emit */
    // "declaration": true,                              /* Generate .d.ts files from TypeScript and JavaScript files in your project. */
    // "declarationMap": true,                           /* Create sourcemaps for d.ts files. */
    // "emitDeclarationOnly": true,                      /* Only output d.ts files and not JavaScript files. */
    "sourceMap": true,                                /* Create source map files for emitted JavaScript files. */
    // "inlineSourceMap": true,                          /* Include sourcemap files inside the emitted JavaScript. */
    // "outFile": "./",                                  /* Specify a file that bundles all outputs into one JavaScript file. If 'declaration' is true, also designates a file that bundles all .d.ts output. */
    "outDir": "./dist",                                   /* Specify an output folder for all emitted files. */
    // "removeComments": true,                           /* Disable emitting comments. */
    // "noEmit": true,                                   /* Disable emitting files from a compilation. */
    // "importHelpers": true,                            /* Allow importing helper functions from tslib once per project, instead of including them per-file. */
    // "importsNotUsedAsValues": "remove",               /* Specify emit/checking behavior for imports that are only used for types. */
    // "downlevelIteration": true,                       /* Emit more compliant, but verbose and less performant JavaScript for iteration. */
    // "sourceRoot": "",                                 /* Specify the root path for debuggers to find the reference source code. */
    // "mapRoot": "",                                    /* Specify the location where debugger should locate map files instead of generated locations. */
    // "inlineSources": true,                            /* Include source code in the sourcemaps inside the emitted JavaScript. */
    // "emitBOM": true,                                  /* Emit a UTF-8 Byte Order Mark (BOM) in the beginning of output files. */
    // "newLine": "crlf",                                /* Set the newline character for emitting files. */
    // "stripInternal": true,                            /* Disable emitting declarations that have '@internal' in their JSDoc comments. */
    // "noEmitHelpers": true,                            /* Disable generating custom helper functions like '__extends' in compiled output. */
    // "noEmitOnError": true,                            /* Disable emitting files if any type checking errors are reported. */
    // "preserveConstEnums": true,                       /* Disable erasing 'const enum' declarations in generated code. */
    // "declarationDir": "./",                           /* Specify the output directory for generated declaration files. */
    // "preserveValueImports": true,                     /* Preserve unused imported values in the JavaScript output that would otherwise be removed. */

    /* Interop Constraints */
    // "isolatedModules": true,                          /* Ensure that each file can be safely transpiled without relying on other imports. */
    // "verbatimModuleSyntax": true,                     /* Do not transform or elide any imports or exports not marked as type-only, ensuring they are written in the output file's format based on the 'module' setting. */
    // "allowSyntheticDefaultImports": true,             /* Allow 'import x from y' when a module doesn't have a default export. */
    "esModuleInterop": true,                             /* Emit additional JavaScript to ease support for importing CommonJS modules. This enables 'allowSyntheticDefaultImports' for type compatibility. */
    // "preserveSymlinks": true,                         /* Disable resolving symlinks to their realpath. This correlates to the same flag in node. */
    "forceConsistentCasingInFileNames": true,            /* Ensure that casing is correct in imports. */

    /* Type Checking */
    "strict": true,                                      /* Enable all strict type-checking options. */
    // "noImplicitAny": true,                            /* Enable error reporting for expressions and declarations with an implied 'any' type. */
    // "strictNullChecks": true,                         /* When type checking, take into account 'null' and 'undefined'. */
    // "strictFunctionTypes": true,                      /* When assigning functions, check to ensure parameters and the return values are subtype-compatible. */
    // "strictBindCallApply": true,                      /* Check that the arguments for 'bind', 'call', and 'apply' methods match the original function. */
    // "strictPropertyInitialization": true,             /* Check for class properties that are declared but not set in the constructor. */
    // "noImplicitThis": true,                           /* Enable error reporting when 'this' is given the type 'any'. */
    // "useUnknownInCatchVariables": true,               /* Default catch clause variables as 'unknown' instead of 'any'. */
    // "alwaysStrict": true,                             /* Ensure 'use strict' is always emitted. */
    // "noUnusedLocals": true,                           /* Enable error reporting when local variables aren't read. */
    // "noUnusedParameters": true,                       /* Raise an error when a function parameter isn't read. */
    // "exactOptionalPropertyTypes": true,               /* Interpret optional property types as written, rather than adding 'undefined'. */
    // "noImplicitReturns": true,                        /* Enable error reporting for codepaths that do not explicitly return in a function. */
    // "noFallthroughCasesInSwitch": true,               /* Enable error reporting for fallthrough cases in switch statements. */
    // "noUncheckedIndexedAccess": true,                 /* Add 'undefined' to a type when accessed using an index. */
    // "noImplicitOverride": true,                       /* Ensure overriding members in derived classes are marked with an override modifier. */
    // "noPropertyAccessFromIndexSignature": true,       /* Enforces using indexed accessors for keys declared using an indexed type. */
    // "allowUnusedLabels": true,                        /* Disable error reporting for unused labels. */
    // "allowUnreachableCode": true,                     /* Disable error reporting for unreachable code. */

    /* Completeness */
    // "skipDefaultLibCheck": true,                      /* Skip type checking .d.ts files that are included with TypeScript. */
    "skipLibCheck": true                                 /* Skip type checking all .d.ts files. */
  },
  "include": [
    "./**/*"
  ]
}
config.ts と index.ts , db.ts を作成
touch config.ts index.ts db.ts
config.ts
export const config = {
    PORT: Number(process.env.PORT) ?? 3000,
    db: {
        host: process.env.DB_HOST ?? "127.0.0.1",
        port: Number(process.env.DB_PORT) ?? 3306,
        user: process.env.DB_USER ?? "alice",
        password: process.env.DB_PASSWORD ?? "password",
        database: process.env.DB_NAME ?? "test"
    }
};
db.ts
import { createPool, Pool } from "mysql2";
import { config } from "./config";

export const pool: Pool = createPool(config.db);
index.ts
import express from "express";
import { config } from "./config";
import { pool } from "./db";

const app: express.Express = express();
const PORT = config.PORT;

app.use(express.json());
app.use(express.urlencoded({ extended: true }));

app.use((req: express.Request, res: express.Response, next: express.NextFunction) => {
    res.header("Access-Control-Allow-Origin", "*");
    res.header("Access-Control-Allow-Methods", "*");
    res.header("Access-Control-Allow-Headers", "*");
    next();
});

app.listen(PORT, () => {
    console.log(`start server on port ${PORT}.`)
})

app.get("/test", (async (req: express.Request, res: express.Response) => {
    res.send("Hello, World!");
}));
MySQLの準備をする
api ディレクトリに移動する
cd ../
mkdir -p db/init
touch db/init/create_table.sql
内容
CREATE TABLE IF NOT EXISTS mytable(
    id integer auto_increment not null primary key,
    username text not null
);
.env ファイルを作成
PORT=3000
DB_HOST=db
DB_PORT=3306
DB_USER=alice
DB_PASSWORD=password
DB_NAME=test
MySQLとexpressの接続の準備
Dockerfile を作成する
touch Dockerfile
内容
FROM node
ENV NODE_ENV=dev
WORKDIR /usr/src/app
COPY ./express-api/ .
EXPOSE 3000
CMD [ "yarn", "dev" ]
Dockerをバックグラウンドで起動する 以下のコマンドでビルドもされる
docker-compose up -d
問題なければこのような表示が出て完了する
 ✔ Network api_my-network  Created                                          0.0s
 ✔ Volume "api_db-store"   Created                                          0.0s
 ✔ Container api-db-1      Started                                          0.0s
 ✔ Container api-sample    Started                                          0.0s
すでにDockerが立ち上がっており、http://localhost:3000/test にアクセスすると、Hello, World! が表示される
また、Docker Desktopの Containers > api > mysql > exec で
mysql -ualice -pを入力すると、mysqlに接続できる
sh-5.1# mysql -ualice -p
Enter password:
Welcome to the MySQL monitor.  Commands end with ; or \g.
Your MySQL connection id is 11
Server version: 8.4.0 MySQL Community Server - GPL

Copyright (c) 2000, 2024, Oracle and/or its affiliates.

Oracle is a registered trademark of Oracle Corporation and/or its
affiliates. Other names may be trademarks of their respective
owners.

Type 'help;' or '\h' for help. Type '\c' to clear the current input statement.

mysql>
また、データベースとテーブルの確認もでき、作成されていることがわかる。
mysql> show databases;
+--------------------+
| Database           |
+--------------------+
| information_schema |
| performance_schema |
| test               |
+--------------------+
3 rows in set (0.00 sec)

mysql> use test;
Reading table information for completion of table and column names
You can turn off this feature to get a quicker startup with -A

Database changed
mysql> show tables;
+----------------+
| Tables_in_test |
+----------------+
| mytable        |
+----------------+
1 row in set (0.00 sec)
Postmanのインストール
APIのテストのため、postman をインストールしておきましょう。 curlなどでも大丈夫ですが、あると便利です。 www.postman.com
MySQLに読み書きするAPIを作成する
APIのエンドポイントは以下の通りです
POST /api/v1/users新規ユーザの作成GET /api/v1/users登録済みユーザリストの取得
index.ts に追記します
...

app.post("/api/v1/users", (async (req: express.Request, res: express.Response) => {
    await pool.promise().query(
        `insert into mytable set ?`,
        [
            {
                id: new Date().getTime(),
                username: String(req.body.username ?? "Alice"),
            }
        ]
    )
    res.status(201).send();
}));
app.get("/api/v1/users", (async (req: express.Request, res: express.Response) => {
    interface User extends RowDataPacket {
        id: number,
        username: string,
    };
    const [users] = await pool.promise().query<User[]>(
        `select * from mytable`
    );
    res.json(users.map(it => {
        return {
            id: it.id,
            username: it.username,
        }
    }));
}));
docker-composeを再ビルドします。 Docker desktop > Containers から api を削除し、その後 Images の api-images を削除します。 その後下のコマンドを打ちます。
docker-compose up -d
APIからデータの読み書きをする
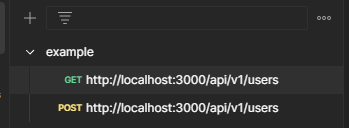
先ほどインストールしたPostmanで collectionを作ります。
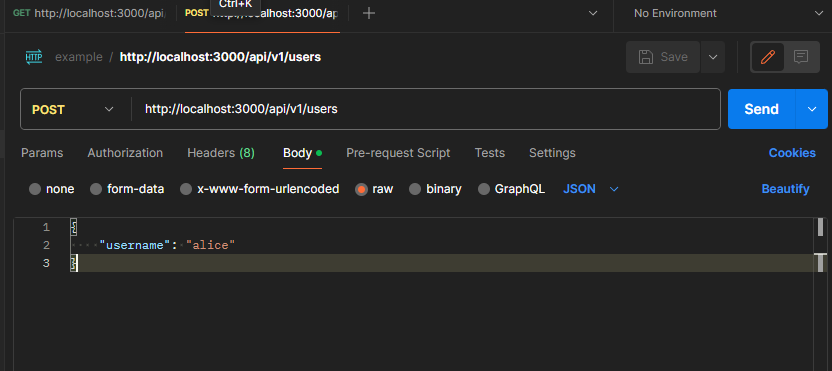
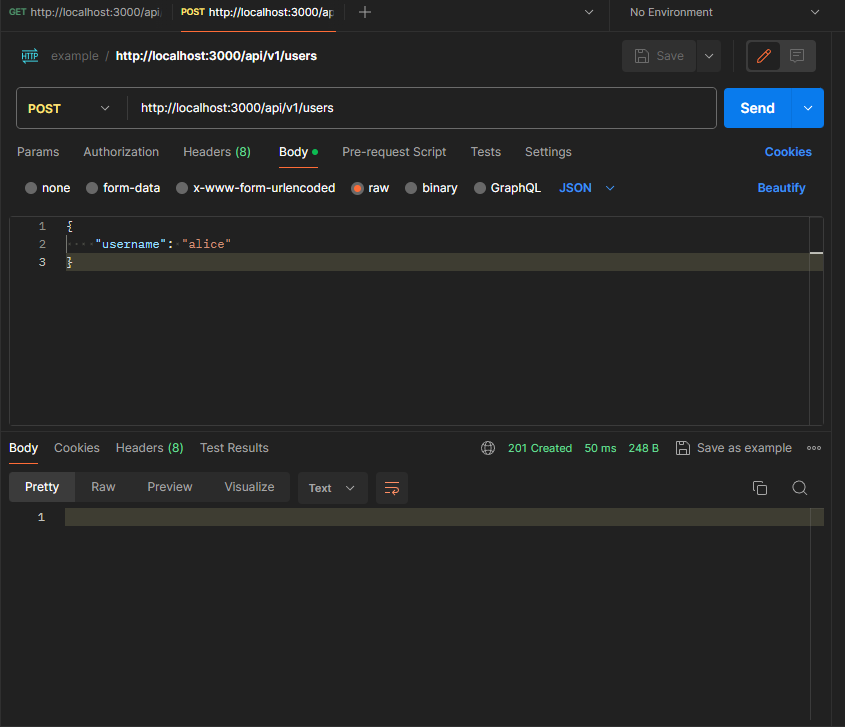
POSTのほうは、以下の画像のように body > raw に json形式でリクエストボディを書きます。
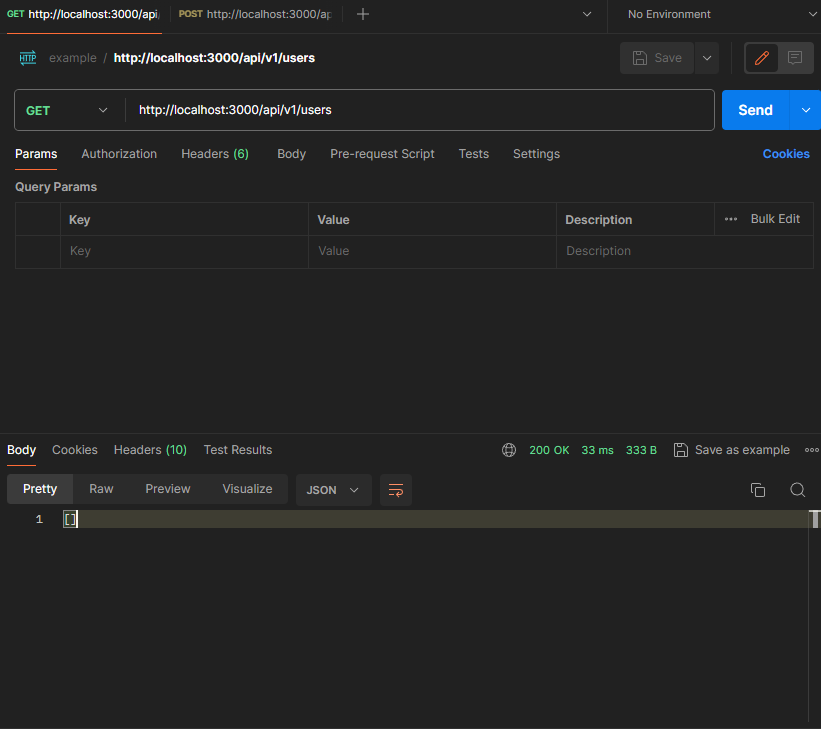
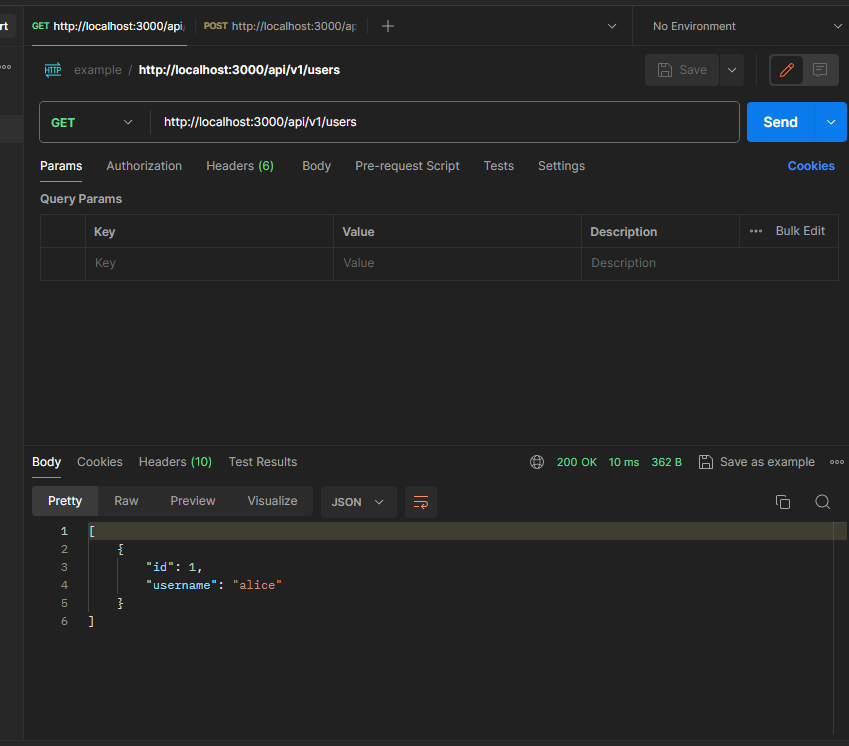
GETリクエストをSend, なにもデータがないため、空配列が返る
POSTリクエストをSend, データが登録された。(レスポンスコード201)
再度、GETリクエストをSend, データが増えている!
おわりに
これで、一通り実装できるようになったかと思います。 長かったですが、慣れればほかの言語やライブラリ使ってもできそうですね。 今回はORM等使ってないですが、組み合わせるとより良いコードになると思います。
*1:好きなエディタでOK
Google Apps Script が便利!
はじめに
最近業務でGoogle Apps Scriptsを使っているのですが、とても便利で何かに使いたいと思いました。 そのときのための、備忘録(チートシート)です。
スプレッドシートを読み込む
URLから読み込む
const ss = SpreadsheetApp.openByUrl("url");
IDから読み込む
const ss = SpreadsheetApp.openById("id");
スプレッドシートのシートの取得
名前で取得
const sheet = ss.getSheetByName("name");
アクティブなシートを取得
const sheet = ss.getActiveSheet();
シートを配列で取得
const sheets = ss.getSheets()
データが入っている最終行の取得
const column = 1;
const lastRow = sheet.getRange(sheet.getMaxRows(), column).getNextDataCell(SpreadsheetApp.Direction.UP).getRow();
sheet.getMaxRows() だと最終行(1000行とか)が取得される
セルとデータの取得
A1のセル・データ取得
データ取得は getValue で行う。
const cell = sheet.getRange("A1");
const data = cell.getValue();
A1:B5のセル・データ取得
データ取得は getValues で行う。
const cells = sheet.getRange("A1:B2");
const data = cells.getValues();
データの書き込み
セルに対して setValue を使う。
cell.setValue("hoge");
複数のセルに対しては setValues() を使う。
cells.setValues([
    ["A1", "B1"],
    ["A2", "B2"]
]);
行の追加
シートに対して、行を追加する場合、appendRow を使う。
sheet.appendRow([1, "hoge", "fuga"]);
doPost, doGet で jsonを返す
const res = {"response": "ok"};
return ContentService.createTextOutput(JSON.stringify(res)).setMimeType(ContentService.MimeType.JSON);
GET, POST通信
GET通信
const response = UrlFetchApp.fetch("url");
const jsonObj = JSON.parse(response.getContentText());
POST通信
const headers = {
  "method" : "post",
  "contentType": "application/json",
  "payload" : JSON.stringify({ hoge: "fuga" })
};
const response = UrlFetchApp.fetch("url", headers);
const jsonObj = JSON.parse(response.getContentText());
その他
ほぼ JavaScript だから雰囲気でなんとかなる